- Published on
LangGraph 集成 FastMCP 2.0 基础教程:两种集成方式的完整实践
- Authors

- Name
- Shoukai Huang

Code in LangGraph(Photo by Fatos Bytyqi on Unsplash) )
LangGraph 与 FastMCP 2.0(MCP 2.0)的结合,主要有两种典型方式:
- 客户端集成:将 FastMCP 服务器暴露的工具、提示与资源,作为 LangGraph 工作流中的可调用节点(最常见)。
- 服务端封装:把已有的 LangGraph Agent 封装为 FastMCP 服务器,对外以标准协议提供能力(反向集成)。
客户端集成
MCP 模拟服务
用于本地测试与调试的 MCP 2.0 模拟服务。
以下示例基于 FastMCP 2.0 编写。
uv add fastmcp
示例代码
最基础的算术工具:
from fastmcp import FastMCP

mcp = FastMCP("MyServer")

@mcp.tool()
def add(a: int, b: int) -> int:
    """Add two numbers"""
    return a + b

@mcp.tool()
def multiply(a: int, b: int) -> int:
    """Multiply two numbers"""
    return a * b

if __name__ == "__main__":
    # Start an HTTP server on port 8000
    mcp.run(transport="http", host="127.0.0.1", port=8000)
uv run concepts-mcp/mcp_server_sample.py
运行后,控制台将输出:
╭────────────────────────────────────────────────────────────────────────────╮
│                                                                            │
│        _ __ ___  _____           __  __  _____________    ____    ____     │
│       _ __ ___ .'____/___ ______/ /_/  |/  / ____/ __ \  |___ \  / __ \    │
│      _ __ ___ / /_  / __ `/ ___/ __/ /|_/ / /   / /_/ /  ___/ / / / / /    │
│     _ __ ___ / __/ / /_/ (__  ) /_/ /  / / /___/ ____/  /  __/_/ /_/ /     │
│    _ __ ___ /_/    \____/____/\__/_/  /_/\____/_/      /_____(*)____/      │
│                                                                            │
│                                                                            │
│                                FastMCP  2.0                                │
│                                                                            │
│                                                                            │
│               🖥️  Server name:     MyServer                                 │
│               📦 Transport:       Streamable-HTTP                          │
│               🔗 Server URL:      http://127.0.0.1:8000/mcp                │
│                                                                            │
│               🏎️  FastMCP version: 2.12.0                                   │
│               🤝 MCP SDK version: 1.13.1                                   │
│                                                                            │
│               📚 Docs:            https://gofastmcp.com                    │
│               🚀 Deploy:          https://fastmcp.cloud                    │
│                                                                            │
╰────────────────────────────────────────────────────────────────────────────╯


[09/01/25 22:54:03] INFO     Starting MCP server 'MyServer' with transport 'http' on                      server.py:1571
                             http://127.0.0.1:8000/mcp
INFO:     Started server process [24590]
INFO:     Waiting for application startup.
INFO:     Application startup complete.
INFO:     Uvicorn running on http://127.0.0.1:8000 (Press CTRL+C to quit)
验证功能
安装并启动 MCP Inspector 使用 npm 安装 MCP Inspector:
npm install -g @modelcontextprotocol/inspector
或者,你可以直接使用npx运行Inspector,无需全局安装:
npx @modelcontextprotocol/inspector
启动后,Inspector 将在浏览器中打开,默认地址为 http://127.0.0.1:6274。
npx @modelcontextprotocol/inspector
Starting MCP inspector...
⚙️ Proxy server listening on 127.0.0.1:6277
🔑 Session token: 668f8a6edafccaa8a276b5bcfbfb1d4e0fe486b14b5b42208d11d777cd7f17b4
Use this token to authenticate requests or set DANGEROUSLY_OMIT_AUTH=true to disable auth

🔗 Open inspector with token pre-filled:
   http://localhost:6274/?MCP_PROXY_AUTH_TOKEN=668f8a6edafccaa8a276b5bcfbfb1d4e0fe486b14b5b42208d11d777cd7f17b4

🔍 MCP Inspector is up and running at http://127.0.0.1:6274 🚀
模拟服务启动后,Inspector 会自动发现并展示 MyServer 服务器的全部工具。
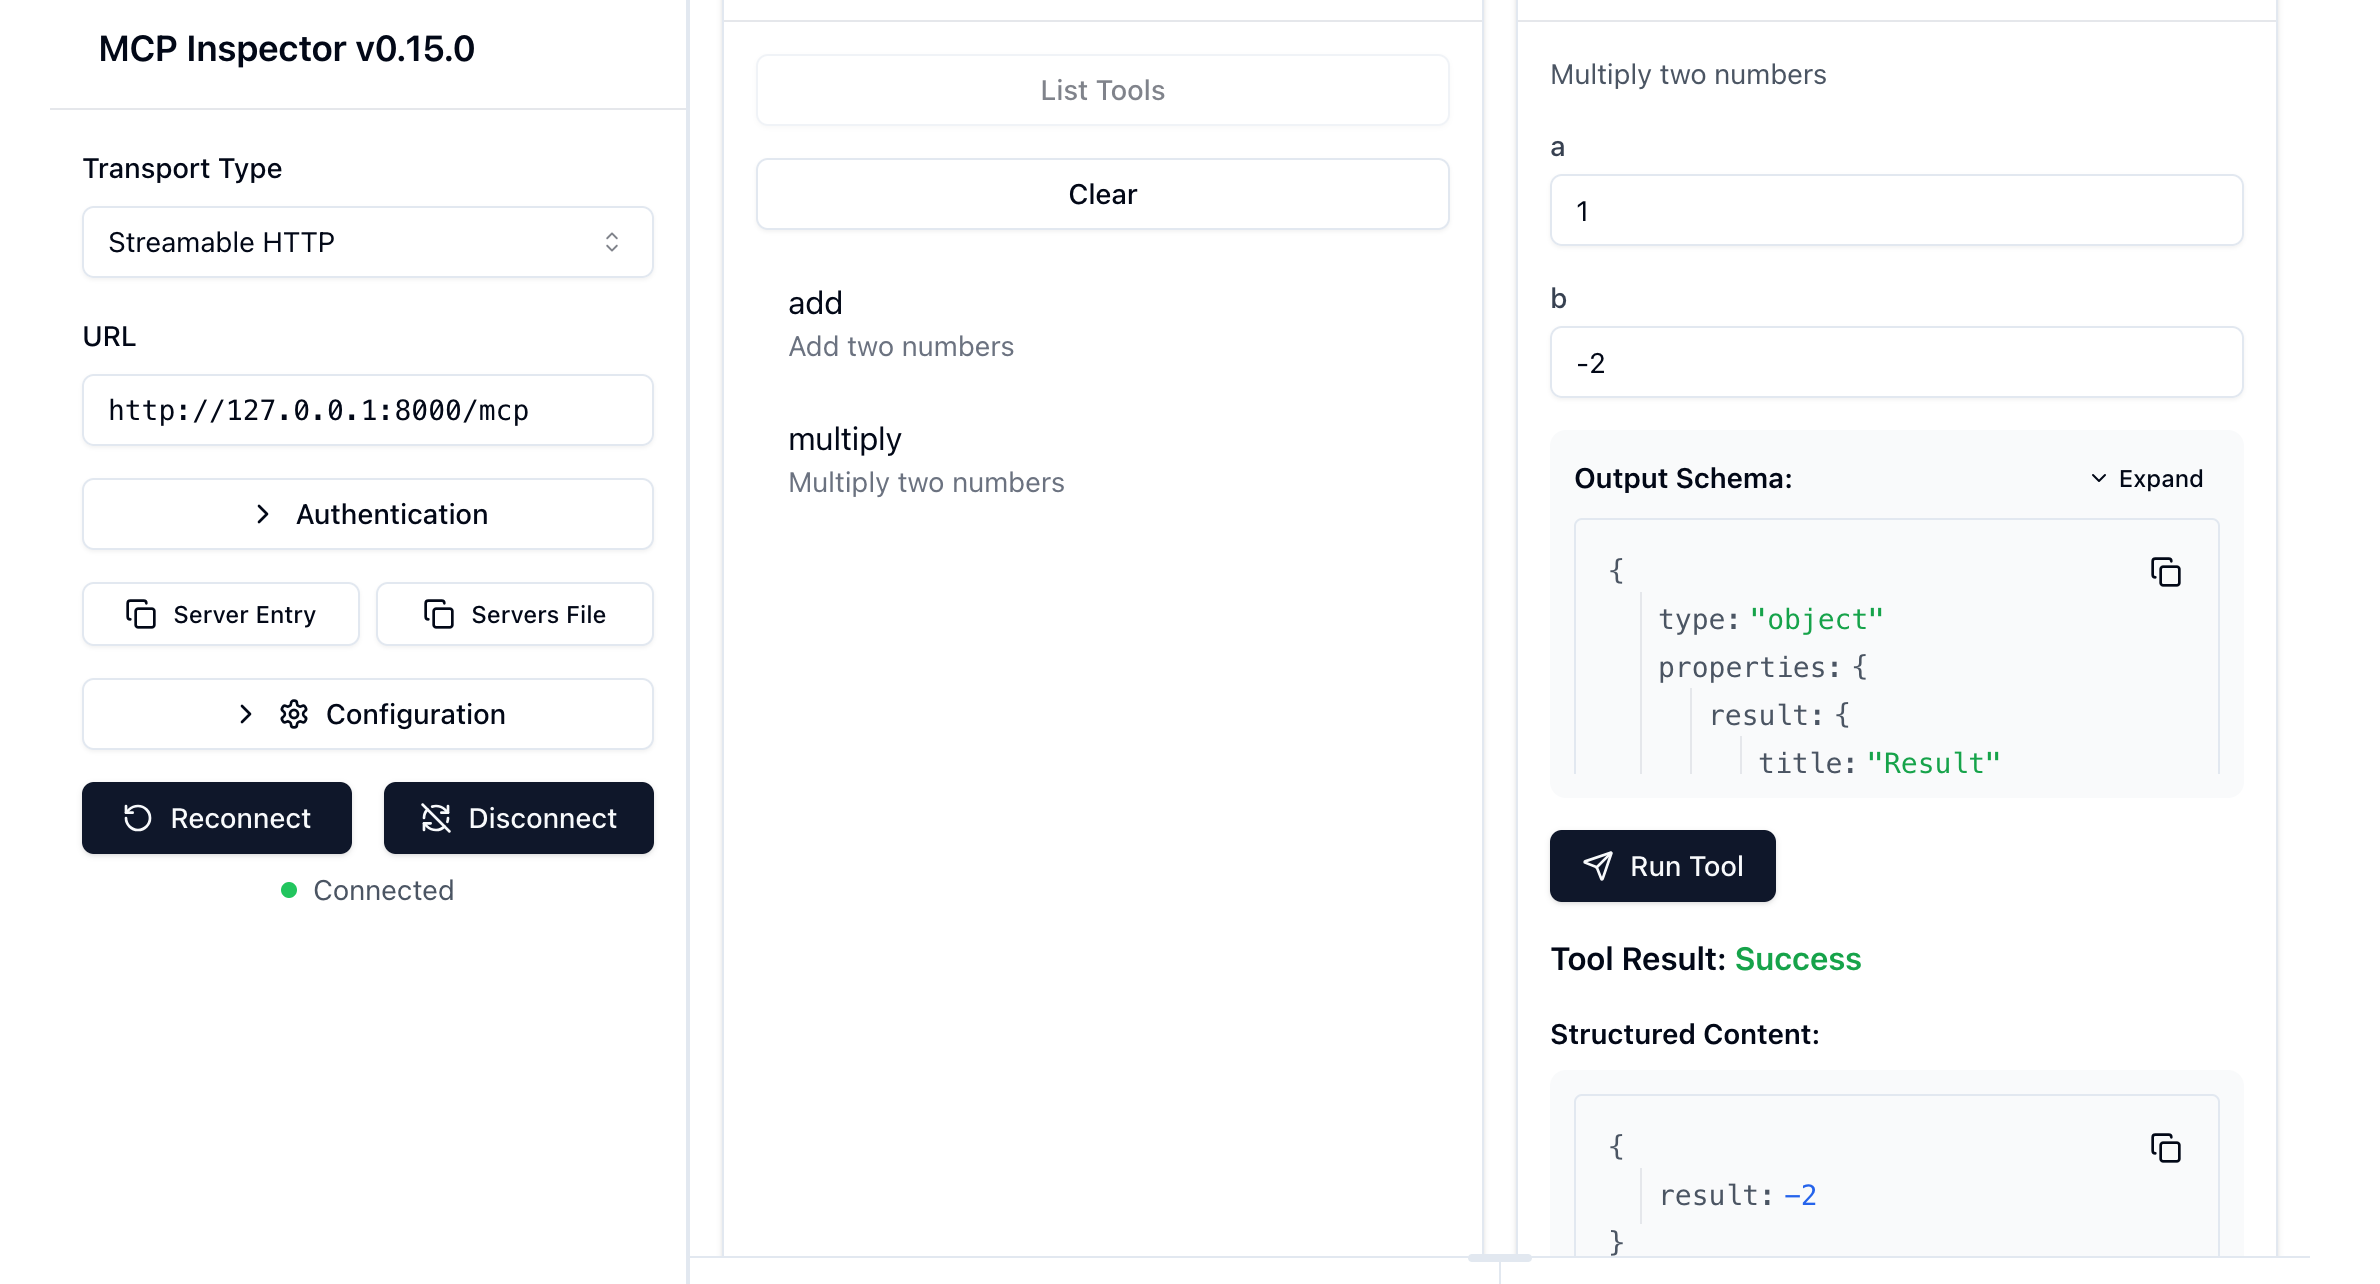
用于快速验证工具可用性,避免集成过程中的干扰项。
LangGraph 调用 MCP 服务
模型上下文协议(MCP)是一项开放标准,用于规范应用如何向语言模型提供工具与上下文。借助 langchain-mcp-adapters,LangGraph 智能体可直接使用 MCP 服务器上定义的工具。
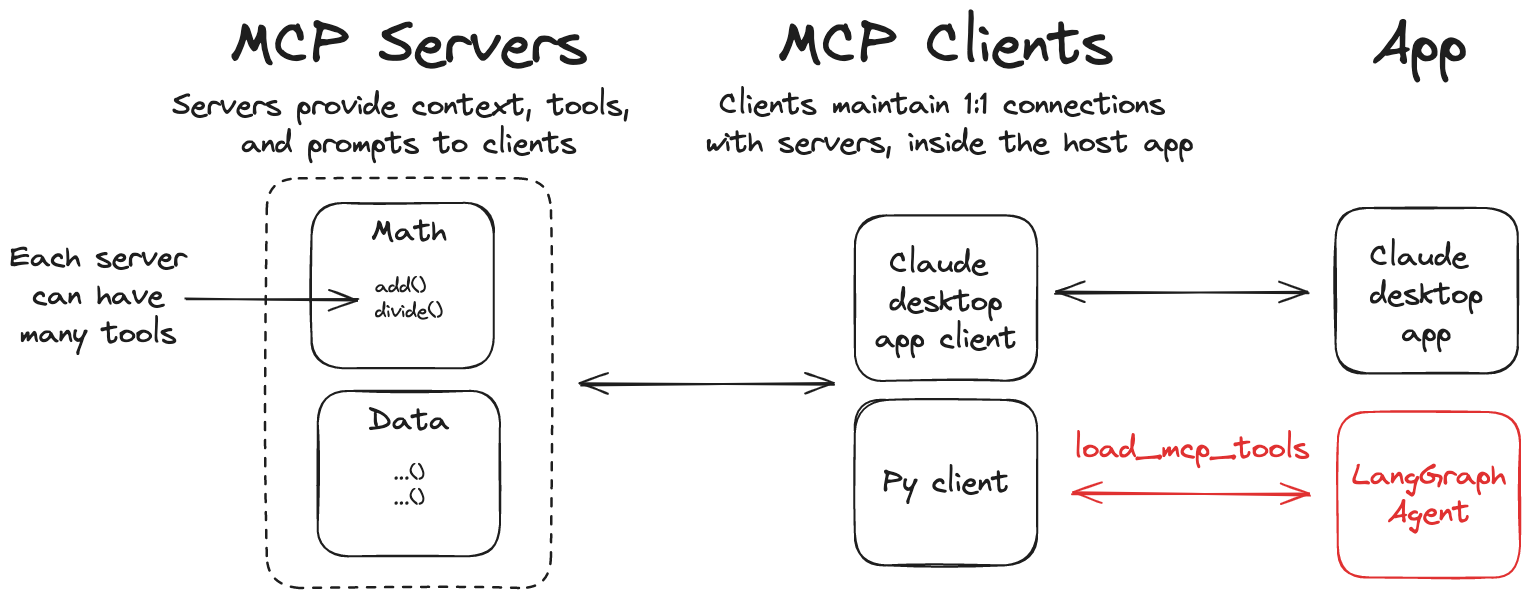
模型上下文协议 (MCP) (图片源自 LangGraph )
安装 langchain-mcp-adapters,使 LangGraph 能调用 MCP 工具。
uv add langchain-mcp-adapters
uv add langchain langchain-openai langchain-deepseek langgraph python-dotenv
工程根目录添加 .env 文件
DEEPSEEK_API_KEY=sk-……
编写代码 langgraph_use_mcp_as_client.py:
from langchain_mcp_adapters.client import MultiServerMCPClient
from langchain.chat_models import init_chat_model
from langgraph.graph import StateGraph, MessagesState, START, END
from langgraph.prebuilt import ToolNode

import os
from dotenv import load_dotenv

# 加载.env文件中的环境变量
load_dotenv()

# Initialize the model
model = init_chat_model(
    "deepseek-chat",  # 使用DeepSeek模型
    api_key=os.environ.get("DEEPSEEK_API_KEY")
)

# Set up MCP client
client = MultiServerMCPClient(
    {
        "math": {
            # make sure you start your math server on port 8000
            "url": "http://127.0.0.1:8000/mcp/",
            "transport": "streamable_http",
        }
    }
)

async def main():
    # Get tools from MCP server
    print("\n=== 获取MCP工具 ===")
    tools = await client.get_tools()
    print(f"可用工具: {[tool.name for tool in tools]}")
    for tool in tools:
        print(f"  - {tool.name}: {tool.description}")

    # Bind tools to model
    print("\n=== 绑定工具到模型 ===")
    model_with_tools = model.bind_tools(tools)
    print(f"已将 {len(tools)} 个工具绑定到模型")

    # Create ToolNode
    tool_node = ToolNode(tools)

    def should_continue(state: MessagesState):
        messages = state["messages"]
        last_message = messages[-1]
        if last_message.tool_calls:
            return "tools"
        return END

    # Define call_model function
    async def call_model(state: MessagesState):
        messages = state["messages"]
        print("\n=== 调用LLM模型 ===")
        print(f"输入消息数量: {len(messages)}")
        if messages:
            print(f"最新消息: {messages[-1].content if hasattr(messages[-1], 'content') else str(messages[-1])}")

        response = await model_with_tools.ainvoke(messages)
        print(f"模型响应类型: {type(response).__name__}")
        if hasattr(response, 'content'):
            print(f"响应内容: {response.content}")
        if hasattr(response, 'tool_calls') and response.tool_calls:
            print(f"工具调用: {len(response.tool_calls)} 个")
            for i, tool_call in enumerate(response.tool_calls):
                print(f"  工具 {i+1}: {tool_call['name']} - 参数: {tool_call['args']}")

        return {"messages": [response]}

    # Build the graph
    print("\n=== 构建LangGraph工作流 ===")
    builder = StateGraph(MessagesState)
    builder.add_node("call_model", call_model)
    builder.add_node("tools", tool_node)
    print("已添加节点: call_model (模型调用) 和 tools (工具执行)")

    builder.add_edge(START, "call_model")
    builder.add_conditional_edges(
        "call_model",
        should_continue,
    )
    builder.add_edge("tools", "call_model")

    # Compile the graph
    graph = builder.compile()

    # Test the graph
    print("\n=== 开始测试数学计算 ===")
    test_question = "what's (3 + 5) x 12?"
    print(f"测试问题: {test_question}")

    math_response = await graph.ainvoke(
        {"messages": [{"role": "user", "content": test_question}]}
    )

    print("\n=== 最终结果 ===")
    print(f"消息链长度: {len(math_response['messages'])}")
    for i, msg in enumerate(math_response['messages']):
        msg_type = type(msg).__name__
        if hasattr(msg, 'content'):
            print(f"消息 {i+1} ({msg_type}): {msg.content}")
        else:
            print(f"消息 {i+1} ({msg_type}): {str(msg)}")

if __name__ == "__main__":
    import asyncio
    asyncio.run(main())
测试结果
MCP 服务器:已在 http://127.0.0.1:8000/mcp/ 成功运行,提供 add 与 multiply 工具。
MCP 客户端:已成功连接到服务器并完成数学计算测试。
- 问题:"what's (3 + 5) x 12?"
- 结果:正确计算出答案 96
- 过程:先调用 add(3, 5) 得到 8,再调用 multiply(8, 12) 得到 96
实际运行效果
通过运行测试,可看到完整的计算流程:
- 问题输入:"what's (3 + 5) x 12?"
- 第一次 LLM 调用:模型决定先计算加法,调用 add(3, 5)
- 工具执行:MCP 服务器返回结果 8
- 第二次 LLM 调用:模型继续计算乘法,调用 multiply(8, 12)
- 工具执行:MCP 服务器返回结果 96
- 第三次 LLM 调用:模型总结最终答案
=== 获取MCP工具 ===
可用工具: ['add', 'multiply']
  - add: Add two numbers
  - multiply: Multiply two numbers

=== 绑定工具到模型 ===
已将 2 个工具绑定到模型

=== 构建LangGraph工作流 ===
已添加节点: call_model (模型调用) 和 tools (工具执行)

=== 开始测试数学计算 ===
测试问题: what's (3 + 5) x 12?

=== 调用LLM模型 ===
输入消息数量: 1
最新消息: what's (3 + 5) x 12?
模型响应类型: AIMessage
响应内容: I'll help you calculate (3 + 5) × 12. Let me break this down step by step.
工具调用: 1 个
  工具 1: add - 参数: {'a': 3, 'b': 5}

=== 调用LLM模型 ===
输入消息数量: 3
最新消息: 8
模型响应类型: AIMessage
响应内容: Now I'll multiply the result (8) by 12:
工具调用: 1 个
  工具 1: multiply - 参数: {'a': 8, 'b': 12}

=== 调用LLM模型 ===
输入消息数量: 5
最新消息: 96
模型响应类型: AIMessage
响应内容: The result of (3 + 5) × 12 is **96**.

Here's the calculation:
- First, 3 + 5 = 8
- Then, 8 × 12 = 96

=== 最终结果 ===
消息链长度: 6
消息 1 (HumanMessage): what's (3 + 5) x 12?
消息 2 (AIMessage): I'll help you calculate (3 + 5) × 12. Let me break this down step by step.
消息 3 (ToolMessage): 8
消息 4 (AIMessage): Now I'll multiply the result (8) by 12:
消息 5 (ToolMessage): 96
消息 6 (AIMessage): The result of (3 + 5) × 12 is **96**.

Here's the calculation:
- First, 3 + 5 = 8
- Then, 8 × 12 = 96
服务端封装
方案概览
本节演示如何将已有的 LangGraph 工作流封装为一个 FastMCP 服务器,对外以 MCP 标准协议提供能力。 核心思路是:在 FastMCP 中注册一个工具(process_text_with_langgraph),其内部调用 LangGraph 的工作流,实现“预处理 → AI 分析 → 结果汇总”的端到端处理。
示例代码:langgraph_use_mcp_as_server.py
#!/usr/bin/env python3
"""
简化的 FastMCP + LangGraph 演示
展示如何在FastMCP中集成LangGraph工作流
"""

import asyncio
import os
from typing import TypedDict, List
from datetime import datetime

from fastmcp import FastMCP, Context
from langgraph.graph import StateGraph, START, END
from langgraph.checkpoint.memory import MemorySaver
from langchain_core.messages import HumanMessage, AIMessage
from langchain_deepseek import ChatDeepSeek
from langchain_core.prompts import ChatPromptTemplate

# 加载环境变量
from dotenv import load_dotenv
load_dotenv()

# 定义简单的状态类型
class TextProcessState(TypedDict):
    input_text: str
    processed_text: str
    ai_response: str
    steps: List[str]

# 初始化DeepSeek模型
model = ChatDeepSeek(
    model="deepseek-chat",
    api_key=os.getenv("DEEPSEEK_API_KEY"),
    temperature=0.7
)

# 创建FastMCP实例
mcp = FastMCP("Simple-FastMCP-LangGraph")

def create_text_processing_graph():
    """创建文本处理的LangGraph工作流"""

    async def preprocess_text(state: TextProcessState) -> TextProcessState:
        """预处理文本"""
        input_text = state["input_text"]

        # 简单的预处理:去除多余空格,添加时间戳
        processed = input_text.strip()
        timestamp = datetime.now().strftime('%Y-%m-%d %H:%M:%S')

        return {
            **state,
            "processed_text": processed,
            "steps": state["steps"] + [f"文本预处理完成 ({timestamp})"]
        }

    async def generate_ai_response(state: TextProcessState) -> TextProcessState:
        """生成AI响应"""
        processed_text = state["processed_text"]

        prompt = ChatPromptTemplate.from_messages([
            ("system", "你是一个专业的文本分析助手。请对用户提供的文本进行分析和总结,提供有价值的见解。"),
            ("human", "请分析以下文本:\n\n{text}\n\n请提供:1) 主要内容总结 2) 关键信息提取 3) 简短评价")
        ])

        try:
            response = await model.ainvoke(prompt.format_messages(text=processed_text))
            ai_content = response.content
        except Exception as e:
            ai_content = f"AI处理出错: {str(e)}"

        return {
            **state,
            "ai_response": ai_content,
            "steps": state["steps"] + ["AI分析完成"]
        }

    # 构建工作流图
    workflow = StateGraph(TextProcessState)

    # 添加节点
    workflow.add_node("preprocess", preprocess_text)
    workflow.add_node("ai_analyze", generate_ai_response)

    # 添加边
    workflow.add_edge(START, "preprocess")
    workflow.add_edge("preprocess", "ai_analyze")
    workflow.add_edge("ai_analyze", END)

    # 编译图
    memory = MemorySaver()
    return workflow.compile(checkpointer=memory)

# 创建全局的LangGraph实例
text_processor = create_text_processing_graph()

@mcp.tool()
async def process_text_with_langgraph(text: str, ctx: Context = None) -> str:
    """
    使用LangGraph处理文本

    Args:
        text: 要处理的文本内容

    Returns:
        处理结果
    """
    return await _analyze_text(text, ctx)

# 原始工具函数(不使用装饰器)
async def _analyze_text(text: str, ctx = None) -> str:
    """内部文本分析函数"""
    if ctx:
        await ctx.info(f"开始分析文本: {text[:30]}...")

    try:
        # 初始状态
        initial_state = {
            "input_text": text,
            "processed_text": "",
            "ai_response": "",
            "steps": []
        }

        # 配置
        config = {
            "configurable": {
                "thread_id": f"analyze_{datetime.now().strftime('%Y%m%d_%H%M%S_%f')}"
            }
        }

        if ctx:
            await ctx.info("执行LangGraph工作流...")

        # 运行工作流
        final_state = await text_processor.ainvoke(initial_state, config)

        if ctx:
            await ctx.info("分析完成")

        # 格式化结果
        result = f"""📊 文本分析结果

📝 原始文本:
{final_state['input_text']}

🤖 AI分析:
{final_state['ai_response']}

⚙️ 处理步骤:
{' → '.join(final_state['steps'])}

⏰ 完成时间: {datetime.now().strftime('%Y-%m-%d %H:%M:%S')}"""

        return result

    except Exception as e:
        error_msg = f"文本分析失败: {str(e)}"
        if ctx:
            await ctx.error(error_msg)
        return error_msg

if __name__ == "__main__":
    import sys

    # 服务器模式
    print("🚀 启动 Simple FastMCP + LangGraph 服务器")
    print("📋 可用工具:")
    print("   - process_text_with_langgraph: 使用LangGraph处理文本")
    print("🌐 服务器地址: http://127.0.0.1:8004/mcp")
    print("💡 测试命令: python simple_fastmcp_demo.py --test")
    print("=" * 60)

    mcp.run(
        transport="http",
        host="127.0.0.1",
        port=8004,
        log_level="info"
    )
启动与验证 在启动前,请确保已在项目根目录配置 .env 并设置 DEEPSEEK_API_KEY。
运行代码
uv run langgraph_use_mcp_as_server.py
启动成功后,可使用 MCP Inspector 连接 http://127.0.0.1:8004/mcp,界面中将自动发现并展示工具 process_text_with_langgraph。 选择该工具,输入任意文本(例如“请分析这段关于 LangGraph 与 FastMCP 集成的描述,给出要点与建议”)进行调用。 工具将返回结构化的文本结果,包括:
- 原始文本:回显你输入的内容;
- AI 分析:模型基于提示模版给出的总结、关键信息与评价;
- 处理步骤:包含“文本预处理完成(时间戳)→ AI 分析完成”的流水;
- 完成时间:本次处理的结束时间戳。
通过 Inspector 调用新增的 MCP 服务器,注意需要调整超时时间
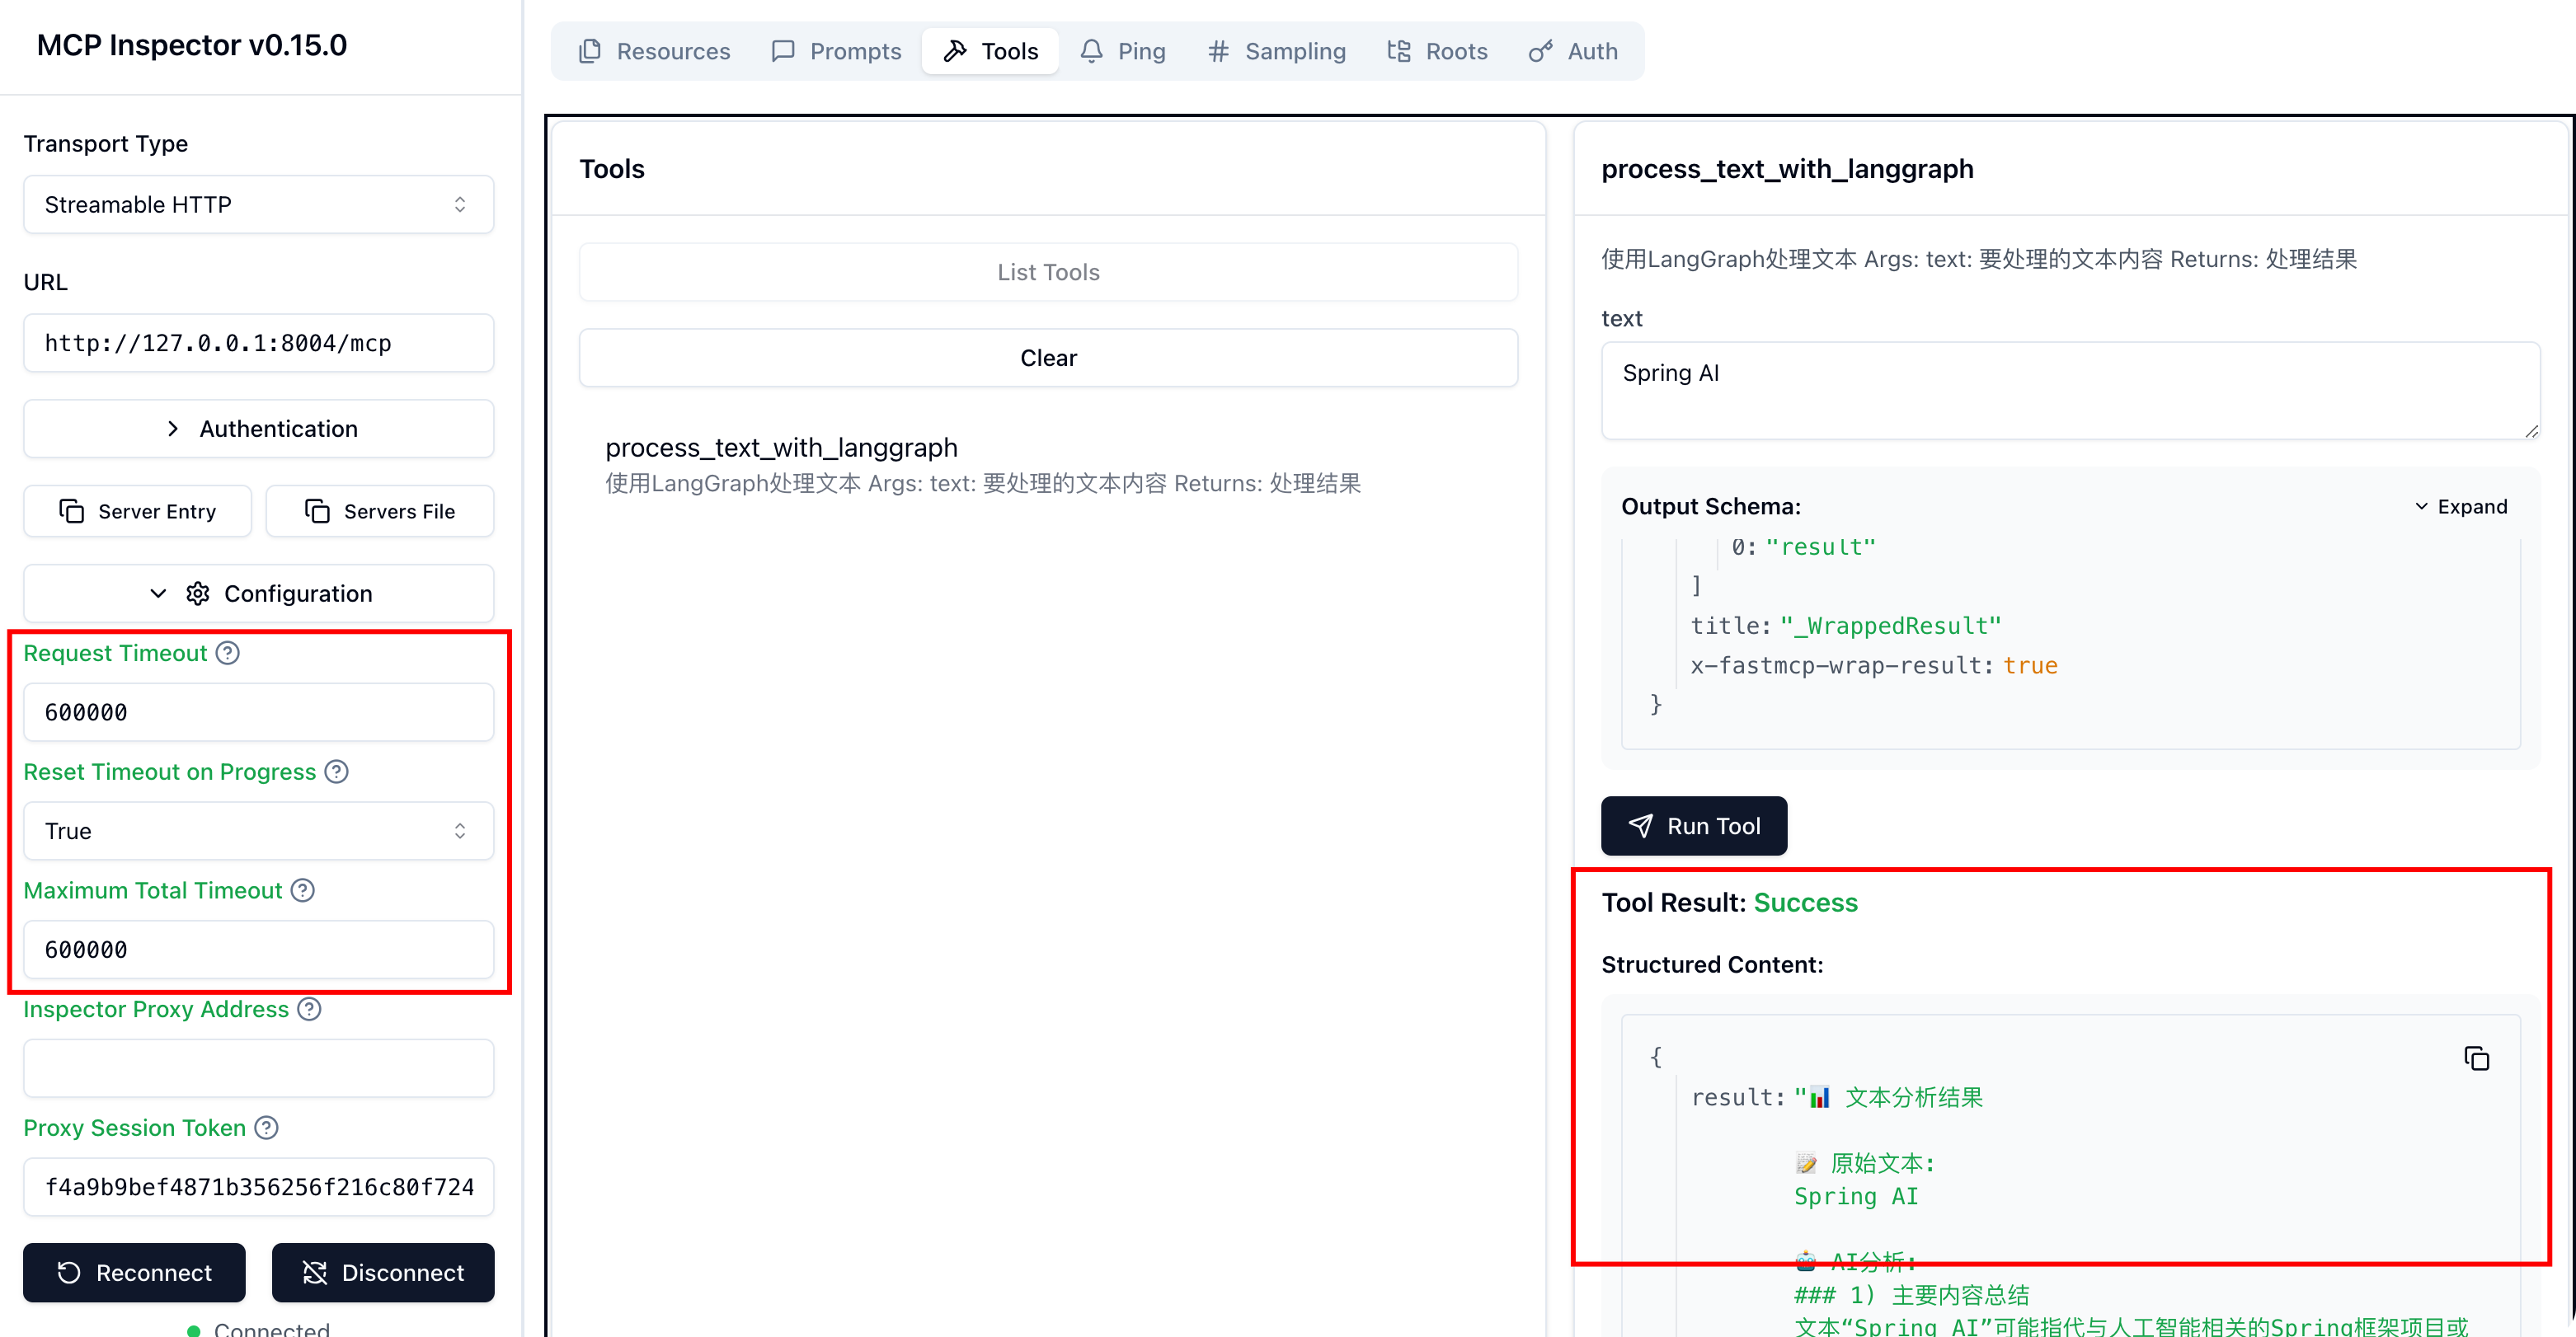
运行结果说明
- 服务器地址:http://127.0.0.1:8004/mcp (HTTP 传输,FastMCP 会输出启动日志)。
- 可用工具:process_text_with_langgraph(用于对文本进行预处理与 AI 分析)。
- 成功调用后:在 Inspector 中可看到该工具的响应正文,包含“原始文本 / AI 分析 / 处理步骤 / 完成时间”等字段;若输入较长文本,处理步骤会显示带时间戳的进度信息,便于排查与复现。
结语
本文从“客户端集成”和“服务端封装”两个维度,展示了 LangGraph 与 FastMCP 2.0 的协作方式:客户端侧可按需调度 MCP 工具,服务端侧可将 LangGraph 工作流以 MCP 标准对外复用。